The Old Photo Restorer helps improve faded, washed-out, yellowed, grainy, and low-resolution photographs directly in your browser. Upload an old family photo, try the AI restoration, use one-click corrections, or adjust individual restoration controls until the picture looks right to you.
The tool combines AI image enhancement with traditional photo-restoration controls for brightness, contrast, fading, yellow color casts, haze, sharpness, noise, highlights, shadows, and more. There is no account to create and your photograph is processed directly in your browser.
Old Photo Restorer & Image Enhancer
JPG, JPEG, PNG, or WebP. Your photo stays in your browser.
🤖 AI Photo Restoration
AI Restore Photo uses Real-ESRGAN to enhance visible detail and enlarge the photo. The photo stays in this browser.
Manual Restoration Controls
Tip: Auto Restore is a starting point. If an old photo has a milky or foggy veil, try Remove Haze, then fine-tune Haze Removal, Color, Contrast, Yellow Cast Removal, and Sharpness.
Rotate, Flip & Download
Restoration improves information already present in the photo. It does not invent missing facial detail or reconstruct information destroyed by severe blur or damage.
📸 See What the Old Photo Restorer Can Do
Old photographs can suffer from fading, weak contrast, yellow or brown color casts, haze, grain, and loss of detail. The example below shows the same photograph before and after using the restoration tools. Results will vary because every photograph has different damage, lighting, color, and image quality.
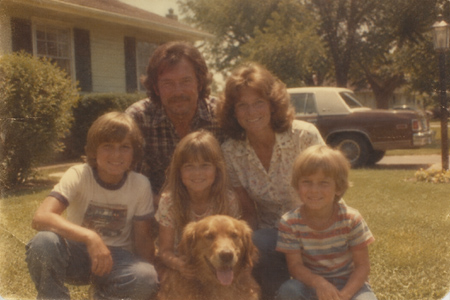
BEFORE: Faded, soft, hazy original photograph
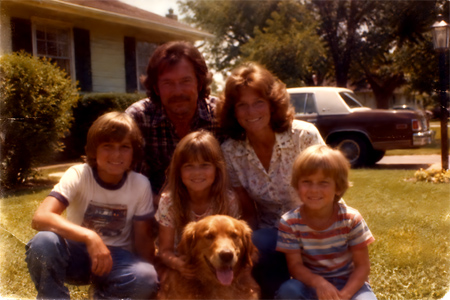
AFTER: AI enhancement and manual photo restoration
Important: This is a restoration and enhancement tool, not a magic reconstruction tool. It can improve information that still exists in a photograph, but it cannot perfectly recreate a face that was completely out of focus, replace a large missing piece of a photograph, or know exactly what was originally hidden beneath severe damage.
🖼️ What Is the Old Photo Restorer?
The Old Photo Restorer is a free browser-based tool for improving digital copies of old photographs. It combines AI image enhancement with traditional image adjustments so you are not limited to a single automatic filter.
Some photographs simply need better contrast. Others have developed a yellow or brown cast. A faded print may have a white or foggy-looking film over the entire picture. Another photograph may be grainy, too dark, washed out, or scanned at a very low resolution.
That is why this tool gives you several ways to work. You can try AI Restore Photo, use the regular Auto Restore button, choose a correction for a specific problem, or use the manual sliders to control the result yourself.
You do not have to understand professional photo editing to use it. Start with the simple options and only touch the individual controls when the photograph needs more help.
🚀 How to Restore an Old Photo Step by Step
If you have never restored a photograph before, do not start by moving every slider. Work through the picture one step at a time. This makes it much easier to see which changes actually help.
Step 1: Upload the Best Copy You Have
Choose your old photograph and load it into the tool. If you have several scans or digital copies of the same photograph, start with the clearest and largest version available.
A higher-quality starting image usually gives the restoration tools more information to work with. If possible, use the original scan instead of a photograph that has already been repeatedly resized, compressed, or saved from social media.
Step 2: Try AI Restore Photo
If the photograph is small, soft, low-resolution, or lacking detail, try AI Restore Photo. The AI enhancement works on the image in sections and attempts to produce a cleaner, higher-resolution version.
Be patient while the AI is working. The processing happens in your browser instead of sending your photograph to a paid cloud restoration service. The speed depends on the size of the photograph, your computer, and your browser.
You may see the tool processing 12 sections on one photograph and 24 or more on another. That is normal. A larger photograph requires more sections and therefore takes longer to process. Keep the page open and allow the restoration to finish.
AI Restore is particularly useful for improving general definition and low-resolution details. It does not guarantee that severe blur, scratches, missing pieces, or completely lost facial details can be reconstructed.
Step 3: Try Auto Restore
Next, try Auto Restore. This is different from AI Restore. Auto Restore uses traditional image corrections to improve common problems such as weak contrast, fading, color imbalance, and the overall appearance of the photograph.
You can use Auto Restore without AI, or you can use it after AI Restore. For many old photographs, using AI Restore first and Auto Restore second provides a useful starting point.
Step 4: Compare It With the Original
Use Hold for Original to compare your restored version with the photograph you started with. This is one of the most important controls in the entire tool.
It is very easy to keep adjusting a picture until you accidentally make it worse. Comparing the edited photograph with the original helps you decide whether the colors, contrast, brightness, and details are genuinely improving.
Step 5: Fix Only the Problems That Remain
If the photograph already looks good, stop. You do not need to use every button or slider.
If you still see a particular problem, such as yellowing, haze, fading, darkness, weak colors, or excessive grain, use the appropriate control below.
🌫️ How to Remove White Haze or a Foggy Film
Some old photographs develop a pale, milky appearance that can look like a thin white film or fog sitting over the picture. Dark areas no longer look truly dark, colors become weak, and the entire photograph can appear washed out.
Use the Haze Removal control for this problem. Start with a low setting and gradually increase it while watching the photograph.
The goal is to make shadows and darker areas clearer without making the picture unnaturally harsh. You do not need to push the slider all the way to maximum.
If people’s faces begin looking too red or orange, the grass becomes unnaturally bright, or colors start looking exaggerated, you have probably gone too far. Move the Haze Removal slider back until the photograph looks natural again.
This is a perfect example of why the manual slider is useful. Two photographs that both look hazy may need completely different amounts of correction.
🟡 How to Fix a Yellow or Brown Old Photo
Color photographs often change as they age. Whites can turn cream or yellow, skin can become orange, and the entire picture may develop a warm brown appearance.
Try Remove Yellow Cast when the whole photograph looks yellowed. Then look carefully at skin, white clothing, walls, clouds, and other areas that give you a clue about what the original colors probably looked like.
You can also use the Warmth control to fine-tune the result. Do not worry about making an old photograph perfectly neutral. Some older film naturally had a warmer appearance. The goal is to remove unwanted discoloration without removing the character of the original photograph.
☀️ How to Restore a Sun-Faded Photograph
Photographs displayed near windows or exposed to sunlight can lose color and contrast over time. One color may fade faster than another, leaving the picture weak and uneven.
Try Sun Fade Recovery as a starting point. You can then use the Fade Recovery control to increase or reduce the effect manually.
Watch faces and clothing while making the adjustment. Restoring some color can make a dramatic improvement, but too much can make an old photograph look artificially saturated.
⚫ How to Improve a Washed-Out Photograph
If the picture looks pale and flat but does not necessarily have a yellow cast, try a small increase in Contrast. Haze Removal may also help if the black and dark areas appear gray instead of dark.
Increase these controls gradually. Strong contrast can make a photograph look impressive at first glance while quietly destroying shadow and highlight detail.
Use Hold for Original frequently so you can see whether the picture is really getting better.
💡 How to Fix a Photo That Is Too Dark
If the entire photograph is too dark, increase Brightness gradually.
If the overall picture looks acceptable but faces, clothing, or objects in dark areas are difficult to see, try adjusting Shadows instead. This can reveal darker details without brightening every part of the photograph equally.
Do not automatically make every shadow bright. Shadows give a photograph depth, and removing too much darkness can make the picture look flat.
☀️ How to Fix Highlights That Are Too Bright
Old photographs and poor scans sometimes have areas that are much brighter than everything around them. Try the Highlights control when bright clothing, windows, sky, faces, or other light areas need adjustment.
Highlights and Brightness are not the same thing. Brightness changes the overall picture, while the Highlights control is intended to help you deal more specifically with the brighter parts of the image.
🎨 How to Fix Weak or Overpowering Colors
Use Saturation when the photograph’s colors are too weak or too strong.
Move the control slowly. A little extra saturation can bring life back to a faded picture. Too much can make grass fluorescent, clothing unnaturally bright, and people’s faces red or orange.
If skin tones start looking strange after another correction, reducing Saturation slightly may help bring them back toward a more natural appearance.
🌡️ How to Adjust Warmth and Skin Tones
The Warmth control changes the overall warm or cool appearance of the photograph.
If a picture looks excessively orange, yellow, or red, reduce the warmth. If it looks unnaturally cold or blue, increase it slightly.
Faces are useful guides, but also look at objects that you know should be neutral, such as white shirts, gray pavement, walls, or clouds.
Remember that old photographs do not have to look like they were taken with a modern digital camera. Keeping a little of the original photographic character can make the restoration look more believable.
🔎 How to Sharpen a Soft Old Photo
Use Sharpness when edges and existing details look slightly soft. A small amount can help hair, clothing, eyes, buildings, lettering, and other details appear more defined.
Sharpness cannot recover information that was never captured. If somebody moved while the photograph was taken and the person’s face is severely blurred, sharpening cannot know exactly what that face originally looked like.
Too much sharpening can also create harsh outlines, halos, and unnatural-looking skin. Increase it gradually and stop when the existing details look clearer.
🧹 How to Reduce Grain and Image Noise
Old film, inexpensive cameras, poor lighting, old scanners, and heavily compressed digital copies can all create visible grain or noise.
Use Denoise gradually to smooth distracting noise. Watch people’s faces, hair, fabric, grass, and other textured areas while adjusting it.
Too much noise reduction can remove genuine detail along with the grain and make people look smooth or plastic. The best setting is usually the lowest amount that makes the noise less distracting.
⚪ How to Improve an Old Black-and-White Photograph
For a black-and-white or grayscale photograph, try Black & White Improve as a starting point.
Afterward, use Brightness, Contrast, Shadows, Highlights, Sharpness, Haze Removal, or Denoise if the photograph still needs additional correction.
Do not worry about the color-oriented controls unless the scan itself has developed an unwanted yellow, brown, or other color tint.
🧠 The Most Important Rule: Maximum Is Not Better
Photo-restoration controls are not volume knobs where turning everything to 100 produces the best result.
A photograph may need only a small amount of haze removal, a little more contrast, and slightly less warmth. Another photograph may need completely different settings.
Move one control at a time. Look at the result. Compare it with the original. If the photograph starts looking unnatural, move the control back.
When you reach the point where you like the picture, stop. You do not need to use every feature simply because it is available.
✨ AI Restore vs. Auto Restore: What Is the Difference?
AI Restore Photo and Auto Restore are two different tools.
AI Restore Photo uses Real-ESRGAN image-enhancement technology to improve resolution and definition. It is useful when an image is small, soft, or lacking detail.
Auto Restore uses traditional image corrections to improve the photograph’s overall appearance, including common fading, color, brightness, contrast, and haze problems.
That is why using both can sometimes produce a better result than either one alone. The AI works on image detail while the traditional restoration controls work on photographic appearance.
🪄 A Simple Starting Recipe for Beginners
If all of these controls sound confusing, use this simple sequence:
- Upload the photograph.
- Try AI Restore Photo if the image is small, soft, or low-resolution.
- Try Auto Restore.
- Use Hold for Original and compare the two versions.
- If the picture looks foggy, adjust Haze Removal.
- If it looks yellow or brown, try Remove Yellow Cast or adjust Warmth.
- If it is faded, try Sun Fade Recovery or Fade Recovery.
- Make small Brightness, Contrast, Saturation, Shadow, Highlight, Sharpness, or Denoise adjustments only when needed.
- Compare with the original again.
- Download the restored photograph when you are happy with it.
You can also skip AI Restore completely. If an old photograph is already large and reasonably sharp but simply has poor color or fading, the regular restoration controls may be all you need.
🐢 Why Does AI Photo Restoration Take Time?
The Old Photo Restorer performs the AI processing locally in your browser. That keeps the tool free and avoids sending every photograph to a paid image-processing API.
Your computer therefore has to do the work. Processing speed depends on your browser, computer hardware, available memory, and the dimensions of the photograph.
The AI processes larger photographs in multiple sections. You might see 12 sections for one image and 24 or more for another. More sections mean more processing time.
If the progress number continues to increase, the tool is working. Keep the page open until the process finishes.
🔒 Your Photos Stay in Your Browser
The restoration process is designed to run directly in your browser. Your personal family photographs do not need to be uploaded to Mike’s Helpers for the image-processing work.
This also helps keep the tool free because Mike’s Helpers does not have to pay a cloud AI service every time somebody restores a photograph.
As with any important photograph, keep your original file somewhere safe. Download the restored version as a separate file instead of treating an edited copy as your only surviving photograph.
🖥️ Why Results Differ From Photo to Photo
No two old photographs have exactly the same problems. One may have faded because of sunlight. Another may have changed color because of age or chemical deterioration. A third may simply be a poor scan of an otherwise good photograph.
The amount of usable information in the original also matters. The tool can enhance visible details, improve resolution, change colors, reduce haze, and make other corrections. It cannot know with certainty what was originally present in an area where all visual information has been destroyed.
This is why the Old Photo Restorer includes both automatic options and manual controls. Instead of pretending one filter can repair every photograph perfectly, you can adjust the restoration to the actual picture in front of you.
🚫 What the Old Photo Restorer Cannot Do
The tool can make many old photographs look considerably better, but it has limits.
It cannot guarantee perfect repair of severe motion blur, completely missing faces, large torn-away areas, deep scratches covering important details, extreme overexposure, or portions of a photograph where the original image information no longer exists.
AI enhancement can improve existing visual information, but it should not be confused with historically accurate reconstruction. If an AI system invents a missing eye, face, sign, or object, that may produce an attractive picture without necessarily reproducing what was actually there.
Mike’s Helpers is designed to improve the photograph you have rather than pretend it can know details that the original photograph never preserved.

Free Video Converter and Crop Editor: 7 Powerful Ways to Edit Videos
🎬 Free Video Converter and Crop Editor Turn Long Videos Into Exactly What You Need Have you ever received a video that was almost perfect for your project? Maybe it was too long, the wrong shape, or saved in a…
🧪 Behind the Tool
The Old Photo Restorer went through considerably more testing than originally planned. The goal was to find an AI enhancement method that could run inside an ordinary web browser without requiring visitors to upload their personal photographs to an external AI service.
Several approaches were tested for AI deblurring, but simply getting an AI model to run was not enough. Some methods failed in the browser, while another successfully processed photographs but actually made severe blur look softer instead of better.
The final tool takes a more practical approach. Real-ESRGAN is used for AI image enhancement and upscaling, while the browser-based restoration controls handle problems such as fading, haze, yellow color casts, brightness, contrast, saturation, sharpness, and noise.
Testing also showed why manual controls matter. Strong haze removal could dramatically clear a washed-out photograph but could also push skin tones too far toward orange or red. The Haze Removal slider lets the person looking at the original photograph decide when the correction looks right.
Like the other tools on Mike’s Helpers, the goal is not to promise magic. It is to provide a useful tool you can try for free, without another account, subscription, or complicated piece of software.
🧠 Frequently Asked Questions
What does the Old Photo Restorer do?
The Old Photo Restorer improves digital copies of old photographs using AI image enhancement and traditional restoration controls. It can help with low resolution, softness, fading, haze, yellow color casts, weak contrast, poor brightness, grain, noise, and other common problems.
Is the Old Photo Restorer free?
Yes. The tool is free to use and does not require an account, subscription, or signup.
Does the Old Photo Restorer use AI?
Yes. The AI Restore Photo option uses Real-ESRGAN image-enhancement technology. The tool also includes traditional browser-based restoration controls because AI upscaling alone does not correct every problem found in an old photograph.
What is the difference between AI Restore Photo and Auto Restore?
AI Restore Photo focuses on improving resolution and image definition. Auto Restore applies traditional corrections to the photograph’s overall appearance. Depending on the picture, you may use either option alone or use AI Restore first and Auto Restore afterward.
Why is AI Restore Photo slower than the other controls?
AI Restore requires substantially more computation than an ordinary brightness or color adjustment. The processing takes place in your browser, and larger photographs require more sections to be processed. Speed therefore depends on the photograph, computer, and browser.
Why did one photo process 12 sections while another processed 24?
The AI divides photographs into sections for processing. Larger images require more sections. Seeing a higher number does not mean anything is wrong or that an earlier photograph is stuck in memory. It simply means the current image requires more AI processing.
Do I need to clear my browser cache between photographs?
No. Uploading a different photograph does not normally require clearing your browser cache. The number of AI processing sections can change from photograph to photograph because their dimensions are different.
What should I try first?
If the photograph is small or soft, try AI Restore Photo first and then Auto Restore. Compare the result with the original. After that, use only the individual controls needed for remaining problems such as haze, yellowing, fading, darkness, or excessive grain.
What is haze in an old photograph?
Haze is the pale, cloudy, or milky appearance that can make an old photograph look as though a thin white film is covering it. It reduces the difference between light and dark areas and can make colors appear weak or washed out.
How do I remove the white fog or film from an old photo?
Use the Haze Removal control and increase it gradually. Stop when the shadows and darker areas look clearer. If skin becomes too red or orange or the colors become unnaturally strong, reduce the setting.
Why did Haze Removal make people’s faces orange or red?
Strong haze correction increases separation between colors and tones that were compressed by the washed-out appearance. On some faded photographs this can make existing warm colors too strong. Reduce the Haze Removal setting and, if necessary, make small adjustments to Saturation or Warmth.
How do I fix a yellow old photograph?
Try Remove Yellow Cast and then adjust Warmth if necessary. Use skin tones and objects that should be white or gray as guides, but remember that some older film naturally has a warm appearance.
Can it restore a sun-faded photograph?
It can often improve a faded photograph. Try Sun Fade Recovery and then use Fade Recovery, Contrast, Saturation, or other controls to fine-tune the result.
Can it restore black-and-white photographs?
Yes. Try Black & White Improve as a starting point. Brightness, Contrast, Shadows, Highlights, Sharpness, Haze Removal, and Denoise can also be useful for older black-and-white scans.
Can it fix a blurry face?
It may improve a slightly soft or low-resolution face, but it cannot guarantee recovery of a face that was severely blurred by movement or poor focus. If the original photograph never captured the facial detail, there may be nothing accurate to recover.
Can it remove scratches and torn areas?
The tool may make small imperfections less distracting through general enhancement, but it is not designed to reconstruct large scratches, tears, missing corners, or completely destroyed portions of a photograph.
Will AI Restore change people’s faces?
The enhancement process can change the appearance of fine details as it improves resolution. For historically important or sentimental photographs, compare the restored result carefully with the original and keep the original file. AI-enhanced detail should not automatically be treated as a perfect historical reconstruction.
Should I move all the sliders to maximum?
No. Maximum is rarely the best setting. Move one control gradually and watch the photograph. If colors, skin, shadows, or details begin looking unnatural, reduce the setting.
What does Hold for Original do?
Hold for Original lets you temporarily compare your edited photograph with the original version. Use it frequently while restoring a picture so you can tell whether your changes are actually improving it.
Can I use Auto Restore after AI Restore?
Yes. This can be a useful combination. AI Restore works primarily on resolution and definition, while Auto Restore works on the photographic appearance. Afterward, use the manual controls only if the picture still needs additional correction.
Does my photo get uploaded to Mike’s Helpers?
The image-processing work is designed to take place locally in your browser rather than uploading your personal photograph to Mike’s Helpers for restoration.
Why does browser-based processing matter?
Browser-based processing helps protect privacy and allows Mike’s Helpers to provide the restoration tool without paying an external AI service for every photograph processed. The tradeoff is that AI restoration speed depends on the visitor’s own computer and browser.
Should I keep my original photograph?
Absolutely. Keep the original scan or digital photograph in a safe location. Save restored versions as separate files so you always have the untouched original available.
What kind of old photo works best?
The best candidates still contain recognizable detail but suffer from problems such as fading, haze, weak contrast, yellowing, grain, softness, or low resolution. Photographs with completely missing or destroyed visual information are much harder to restore accurately.
Will every photograph look dramatically better?
No. Results depend on the condition and quality of the original. Some photographs may show a substantial improvement, while others may improve only slightly. The manual controls are included so you can adjust each photograph according to its individual problems.
Can I download the restored photograph?
Yes. When you are satisfied with the result, use the download options in the tool to save your restored image.
This site is ad-supported and free to use. If one of the tools helped you today, feel free to leave a tip.